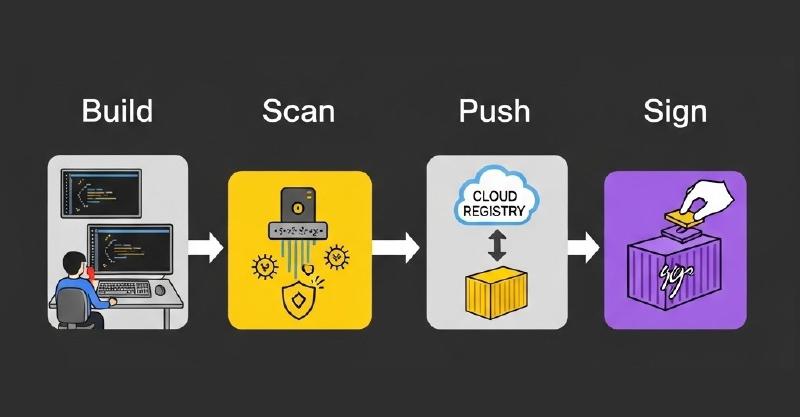
After my initial impression of Dagger I couldn’t stop there. To further investigate the possibilities of Dagger I decided to spend to on building my first real-scenario pipeline. I picked an use case where I want to build a container image using a Dockerfile. Then scan it to make sure no critical vulnerabilities are present. When this is not the case I want to push this image to a container registry and sign it with a signature. Let’s see how that went.
All my code used for this pipeline can be found on my Github.

Building the container
Module used: Docker
For building the container I used the already available support of Buildkit in Dagger for building container images. I decided to first focus on building images with a Dockerfile as this is the most common way of building images. Dagger promotes to “Daggerize” your container builds to take advantage of function and the dagger api. Nevertheless for this initial pipeline I decided to work with a Dockerfile as this would make the pipeline very suitable for transforming existing pipelines to Dagger.
By using the function Container.Build() I can reuse the logic from Dagger for building the actual image. I just pass the arguments to the Dockerfile so the build process knows what to actually build. I ended up with a function that looks like this:
func (d *Docker) DockerBuild(
    ctx context.Context,
    dir *dagger.Directory,
    file string) *dagger.Container {
	return dag.Container(
        dagger.ContainerOpts{}).Build(
            dir,
            dagger.ContainerBuildOpts{Dockerfile: file})
}
Scanning the container
Module used: Trivy
Next in this workflow is scanning the image for CVEs. For this I’m using the capabilities from Trivy. Tools like this can be integrated within a Dagger pipeline greatly. By starting a container with a Trivy image reference I can run the Trivy CLI and pass the freshly build container as the input. For scanning custom build containers I created the Trivy.ScanContainer() function to do the scanning and creating the SBOM file.
By creating a SBOM file the pipeline becomes very flexible as the SBOM can be used in a lot of other processes. For now I use the SBOM format to analyze which vulnerabilities have been found.
The ScanContainer function then ends up like this. It uses the input from t.Base() where the required container is defined. With the .File() function I can output the created file and return it as the function output. Now this SBOM can be used by the next step.
func (t *Trivy) ScanContainer(ctx context.Context, ctr *dagger.Container, imageRef string) *dagger.File {

	return t.Base().
		WithMountedFile("/scan/"+imageRef, ctr.AsTarball()).
		WithExec([]string{
			"trivy",
			"image",
			"--scanners", "vuln",
			"--quiet",
			"--severity", "HIGH,CRITICAL",
			"--format", "cyclonedx",
			"--output", "sbom.json",
			"--input", "/scan/" + imageRef}).File("sbom.json")
}
The second step in this process is to analyze the results defined in the SBOM file. This step is important in my pipeline because I want to stop the pipeline if any critical CVEs have been found. I know this is not the best criteria to define a container “safe” but for the initial process this is a good start. I’ve created the function Trivy.AnalyzeResults() to gather the results from the SBOM and identify if any critical CVEs have been found. If so it will return exit code 1 and stop the pipeline. If all is fine then the pipeline can continue.
I created the AnalyzeResults function as shown below. The code itself might be up for improvement but for now I wanted to focus on the Dagger setup itself. It does the trick by getting the SBOM file and going through all the vulnerability information.
func (t *Trivy) AnalyzeResults(ctx context.Context, sbom *dagger.File) (string, error) {
	var report CycloneDXReport
	content, err := sbom.Contents(ctx)
	if err != nil {
		return "", fmt.Errorf("failed to read file: %w", err)
	}

	if err := json.Unmarshal([]byte(content), &report); err != nil {
		return "", fmt.Errorf("failed to parse JSON: %w", err)
	}

	hasCritical := false
	total := len(report.Vulnerabilities)

	output := fmt.Sprintf("🔍 Found %d total vulnerabilities\n", total)

	for _, v := range report.Vulnerabilities {
		severity := "UNKNOWN"
		if len(v.Ratings) > 0 {
			severity = strings.ToUpper(v.Ratings[0].Severity)
		}

		if severity == "CRITICAL" {
			hasCritical = true
		}

		affected := "(unknown component)"
		if len(v.Affects) > 0 {
			affected = v.Affects[0].Ref
		}

		output += fmt.Sprintf("- [%s] %s in %s (via %s)\n", severity, v.ID, affected, v.Source.Name)
	}

	if hasCritical {
		output += "❌ CRITICAL vulnerabilities found. Failing pipeline.\n"
		return output, fmt.Errorf("critical vulnerabilities found")
	}

	output += "✅ No CRITICAL vulnerabilities found. Passing pipeline.\n"
	return output, nil
}
Pushing the container
Module used: Docker
After marking the image “safe for use” we can push it to the registry. Again here I’m re-using the already available functions from Dagger. This time we can leverage the Container.Publish function and pass the location where we want to push to.
Again as we can re-use the logic from Buildkit. This makes it possible to use this clean function to push an image. For authentication I leverage the authentication already present on the machine where the pipeline is started.
func (d *Docker) PushImage(ctx context.Context, container *dagger.Container, address string) (string, error) {
	string, error := container.Publish(ctx, address)
	if error != nil {
		return "", error
	}
	return string, nil
}
Signing the container
Module used: Cosign
Last but not least I wanted to sign the image to make clear that this image was created by this pipeline and passed all the validation steps. For this I used Cosign as the tool for signing the image. With a local private key I can sign the image in the container registry. Cosign took a bit more effort because the process of signing requires a lot of variables. Here I really experienced how great it is that I can look for similar modules in the Daggerverse. Because the public dagger modules are not artifact outputs but reference the real code, it’s easy to copy code and check how others solved similar issues. In this case special thanks to Puzzle where I copied quite some code from his dagger-module-cosign.
Again here we use the capabilities from Dagger to start a new container with the Cosign tool we require. We pass all arguments with keys, passwords and the image reference.
But we want our private key and passwords to remain private. Dagger already thought about this and created a neat solution for working with secrets. Function arguments can be defined as dagger.Secret which makes it a special type of argument. Next you can supply the secret information by using a file reference like file:// or make sure the information is available as an environment variable and using env://. Even support for Hashicorp vault vault:// or 1Password op:// are supported. More information around this can be found here.
For the cosign module I’m using an environment secret reference. This to make sure I can easily expose the secret information to the container that performs the actual signing. All logic for signing I’ve programmed into a custom function called Cosign.Sign().
func (c *Cosign) Sign(
	ctx context.Context,
	// Cosign private key
	privateKey dagger.Secret,
	// Cosign password
	password dagger.Secret,
	// registry username
	registryUsername *string,
	// name of the image
	registryPassword *dagger.Secret,
	// Container image digests to sign
	digest string) ([]string, error) {
	stdouts := []string{}
	cmd := []string{"cosign", "sign", digest, "--key", "env://COSIGN_PRIVATE_KEY", "--tlog-upload=false"}
	if registryUsername != nil && registryPassword != nil {
		pwd, err := registryPassword.Plaintext(ctx)
		if err != nil {
			return nil, err
		}

		cmd = append(
			cmd,
			"--registry-username",
			*registryUsername,
			"--registry-password",
			pwd,
		)
	}
	cosign := dag.
		Container().
		From("chainguard/cosign:latest").
		WithUser("nonroot").
		WithEnvVariable("COSIGN_YES", "true").
		WithSecretVariable("COSIGN_PASSWORD", &password).
		WithSecretVariable("COSIGN_PRIVATE_KEY", &privateKey).
		WithExec(cmd)

	stdout, err := cosign.Stdout(ctx)
	if err != nil {
		return nil, err
	}

	stdouts = append(stdouts, stdout)

	return stdouts, nil
}
Tie this all together
Module used: BuildImage
When you tie all these separate functions together and use them as dependency modules. All we have to do is create a new dagger module and install the dependency modules like this:
dagger install https://github.com/wouter2397/dagger-modules/docker
dagger install https://github.com/wouter2397/dagger-modules/trivy
dagger install https://github.com/wouter2397/dagger-modules/cosign
And we end up with this very clean pipeline definition:
func (m *BuildImage) BuildImage(ctx context.Context, dir *dagger.Directory, file string, imageRef string, privateKey *dagger.Secret, registryUsername string, registryPassword *dagger.Secret, password *dagger.Secret) (string, error) {
	container := dag.Docker().DockerBuild(dir, file)
	sbom := dag.Trivy().ScanContainer(container, imageRef)
	output, err := dag.Trivy().AnalyzeResults(ctx, sbom)
	if err != nil {
		return "", err
	}
	imageDigest, err2 := dag.Docker().PushImage(ctx, container, imageRef)
	output += imageDigest
	if err2 != nil {
		return "", err2
	}
	_, err3 := dag.Cosign().Sign(ctx, privateKey, password, registryPassword, imageDigest, dagger.CosignSignOpts{
		RegistryUsername: registryUsername,
	})
	if err3 != nil {
		return "", err3
	}
	return output, nil
}
Wrapping up
Last week I got my first hands on experience with Dagger. Now I can already share a working pipeline for building container images. Overall Dagger has been great so far. I’m a big fan of the local development possibilities and how dagger functions can be shared with modules. This pipeline is only a fast concept version of what is possible. With this pipeline I learned a lot on how to use Dagger. I’m planning to invest more time into Dagger and hopefully I can share some more topics in the near future.